

The mission of Tinos Ecolodge is to achieve the self-sustaining status. From the initial design and research of the different environmental technologies the team went to the implementation through a fairly extensive design process. The stone lodges were constructed perfectly integrated into the natural environment. The use of renewable energy sources, the application of passive solar, cooling and ventilation systems, the collection and storage of rainwater and wastewater treatment are some of the measures implemented, making Tinos Ecolodge independent of the central supply network. Its simplicity of form, the absence of frills and the use of natural materials align nicely with the natural beauty of the site.
Architectural design

Floor plan of the large stone house
The large stone ground floor house of 45.2 sq.m. is developed in plan L and consists of a living room, a kitchen, two bedrooms and a bathroom. On the north east side of the house, the bright living area with the built-in open kitchen have unobstructed view of the sea and the natural landscape. To the south, adjacent to the living room, the south pergola delivers a covered patio, which hosts the open air dining area. The two bedrooms and a bathroom are located on the west side of the house. The master bedroom opens to a second outdoor terrace covered with a seed trellis on the south side of the house. This second open-plan seating area is formed of the exterior stone wall that protects the buildings from the strong north winds.
Big stone house plans
-
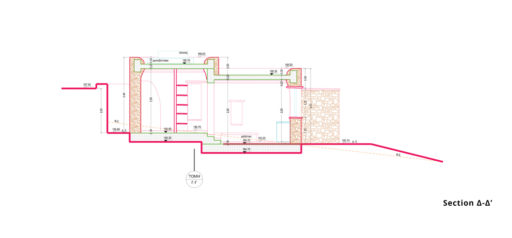
- Section Δ-Δ’

-
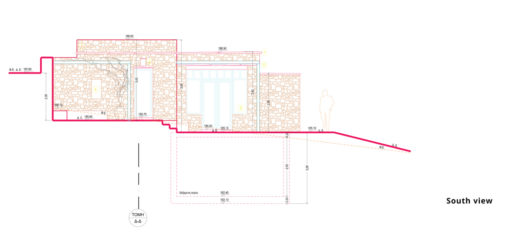
- South view

-

- East view

Sun path diagrams with shadow ranges throughout the year
During the design process of the two houses, the Tinos Ecolodge team used sun simulation programs on the plot in order to better understand the impact of the sun in relation to their project and its surrounding context. The sun path is a visual representation of the sun’s range movement across the sky at the specific geographic location of their project, on the outskirts of Tinos Island. Four specific months have been chosen to show the sun path and the shadow area changing process, January, April, June and August.
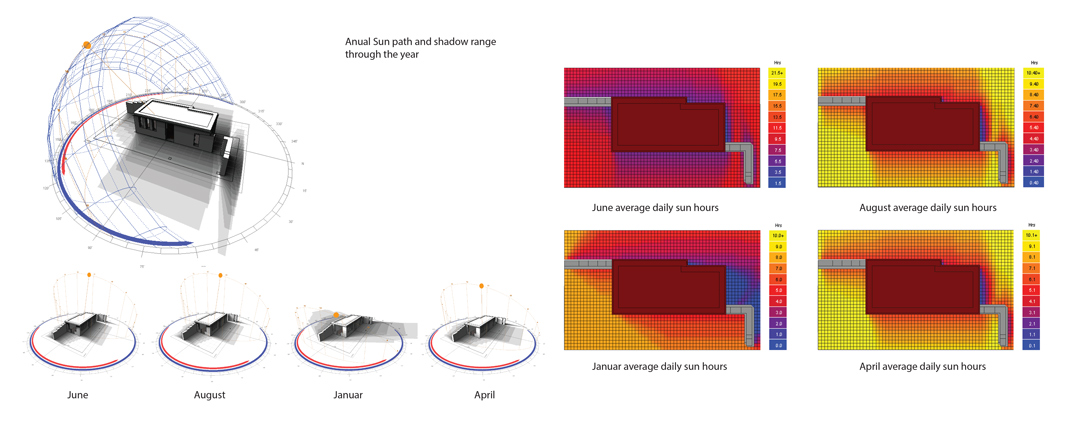
Annual sun path and shadow range of the small stone house through the year
Calculation of daylight factor levels

Variant: North window moved to west corner. two skylights 60X60 cm, one on the bedroom and one on the livingroom. Time:14.:00
The daylight levels inside the houses where simulated in the design process, that helped position the windows and skylights to the desired positions in order to archive optimal lighting condions. The daylight factor is the most commonly used performance indicator for the evaluation and specification of daylight conditions in buildings. It evaluates the amount and distribution of diffuse light in the building in relation to the amount of diffuse light available outside under cloudy sky conditions, and is expressed as a percentage. Daylight factor levels are determined on a plan view and at 3D sections.
Construction progress

(clockwise from left) Foundation of the small stone house. Basic infrastructure is placed in the foundation such as wastewater, fresh water and electricity. (next image) Construction process of cistern. The cistern required to store the rainwater throughout the summer. Cistern 240sqm of hard surface collects around 100,000L of rainwater for 6-8 people and for irrigating the gardens. (last image) Concrete slab that form the ground floor of the small stone house.

Construction process of the big stone house. Empty pipes are directly installed in the floors and walls so electricity wiring is prepared and it is now invisible on the finished wall.

(clockwise from left) The stone masons worked in teams of 2, one on the outside wall and the other on the inside. The stone wall has a thickness of 50 cm . Between the outer and inner sides of the wall, there is a filling of smaller untreated stones and mortar.(next image) Stone masonry started at the small house. 30% of the stones are extracted from the plot excavation and used in building the walls. The rest came from a local quarry. (last image) Placed single irregular stones lintels across the top of the doors and windows.

Construction process of wooden ceiling which is insulated with 5cm Dow insulation (Extruded polystyrene insulation/ XPS). The concrete slab was poured/ cast over the insulation layer.

(left image) Applying cement mortar on the terraces and on the inner floor of the houses and. Warm, earthy cementitious colors were chosen for lining floors (interior and exterior), terraces and built-in furniture in the kitchen and bathroom. (right image) Construction of a masonry kitchen counter-top.

(clockwise from left) The frames were made from custom-made local carpenter. In the large wooden windows, German mechanisms were installed to close the openings as tightly as possible. The frames were placed in the middle of the stone wall in order to limit the sunlight you absorb from the wooden frame and better protection from rainwater. Double energy glass panels were placed by filling the gap with argon gas and a low-emission coating (Low-e). (next two images) Construction process of the wooden pergola with reeds. Reed shading provides relief from harsh rays while still allowing for a cooling breeze to pass through.
We like to thank Nick Bedau for the information,
photos and plans he provided us. More articles
about Tinos Ecolodge and their expansion will be coming soon.


